My Kanban App (with gifs!)

This is just a quick write-up of a little project I worked on for a day or so, so I can come back to it later. The reasons I did this project:

  • I wanted to work through a few new tools to see if they were viable for use in my DT classes.
  • I was a bit burnt out after the end-of-year stresses of NCEA so wanted a bit of a hack day to refresh

New technologies

  • Flask – micro-framework for quickly building web sites and apps
  • Jinja2 – template engine, the flask default
  • Sqlite – database – using this means students can more easily work on their own devices, and the db will be included in source control

Process

  1. I had this tutorial bookmarked for a few months. I saw it pop up on reddit and then twitter so hoped it would be good for starting. It was.
  2. tutorialspoint helped me out again with a useful resource on WTForms. A very interesting way to generate and deal with forms
  3. Bits and pieces from this ultra in-depth tutorial
  4. A very easy to follow article on building a base template and then child templates with Jinja2
  5. Also this one for passing sets through to a template, then processing them in the template
  6. The Jinja2 docs for conditions, loops, nesting, whitespace control, variables, comparisons and logic
  7. stackoverflow.com – found answers to somewhere from 50-100 questions, probably

What I made

The second tutorial I started isn’t listed above because I worked through part 1 of 4 and then realised the author never actually wrote parts 2-4. It was a note taking app, kind of like a simple blog actually. I thought that was boring and as I fiddled with the notes I got the idea of making a simple Kanban app. So I did.

Features

Create new notes

Use a simple form to create new notes. Kind of wish I’d had title and description fields, but oh well. Maybe in the next release.
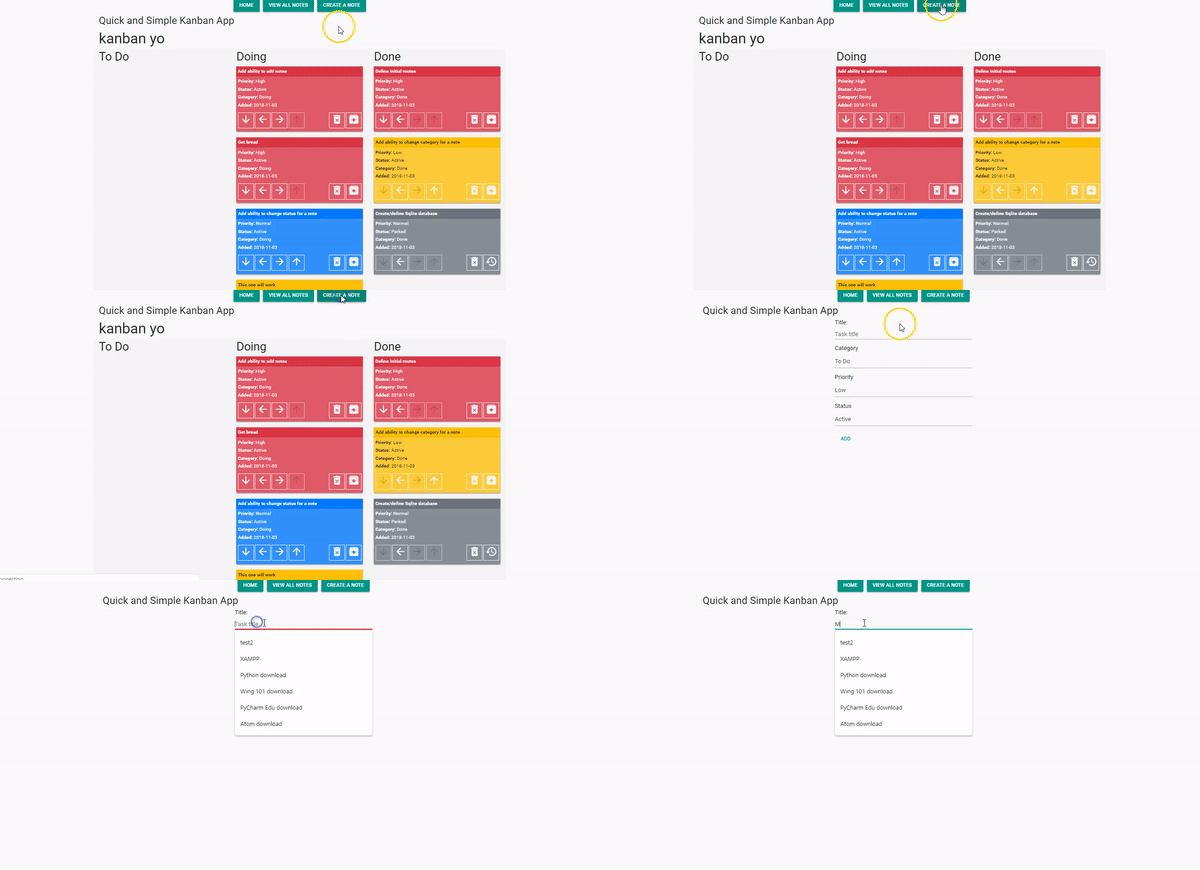
create

Assign and change priority (Low, Normal, High)

The cards order automatically with highest at the top, then normal, then low. Buttons deactivate if the action is impossible (decrease from low priority or increase from high). At first I had the buttons disappear when the action was impossible but it was super confusing to use when the buttons moved.
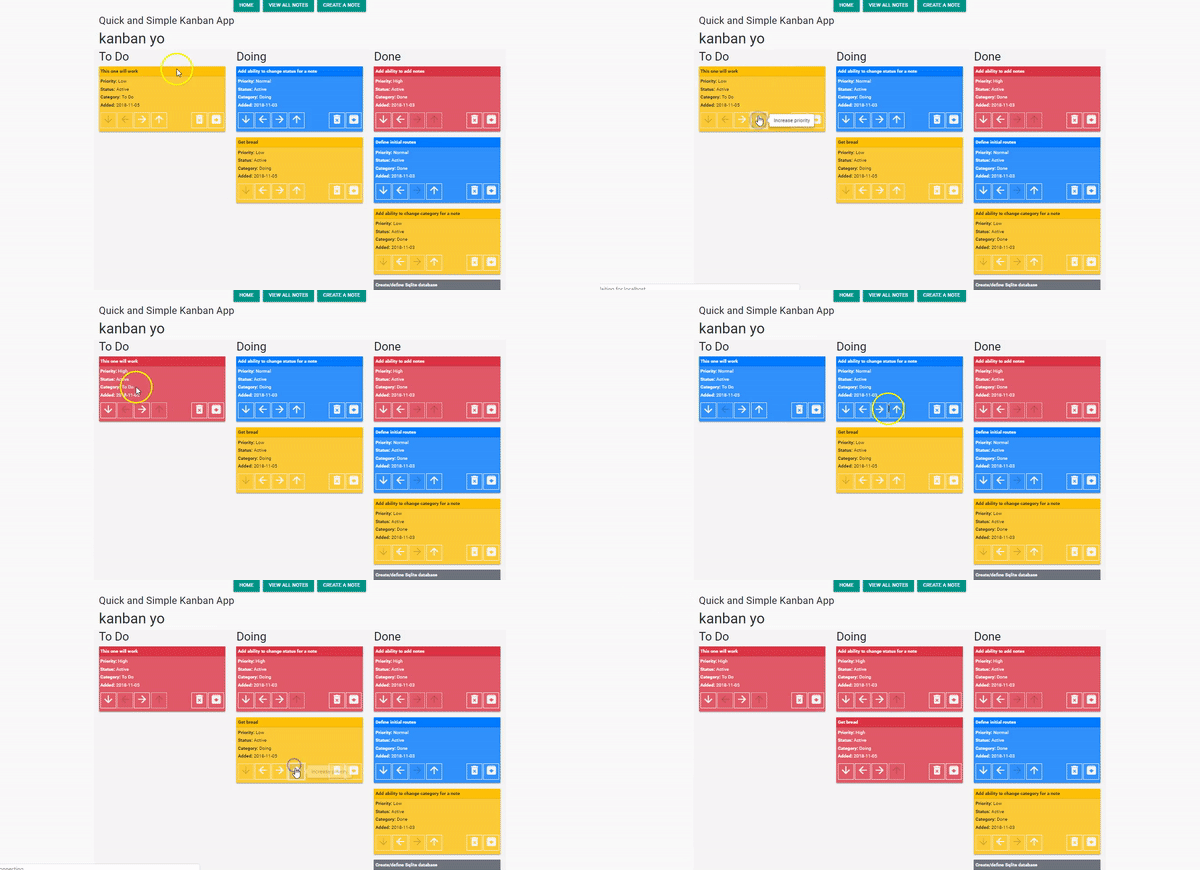
priority

Move cards/tasks between columns

Obviously you need to be able to promote the tasks (and maybe demote them if there’s a reason to). Again, buttons deactivate when the action is impossible.
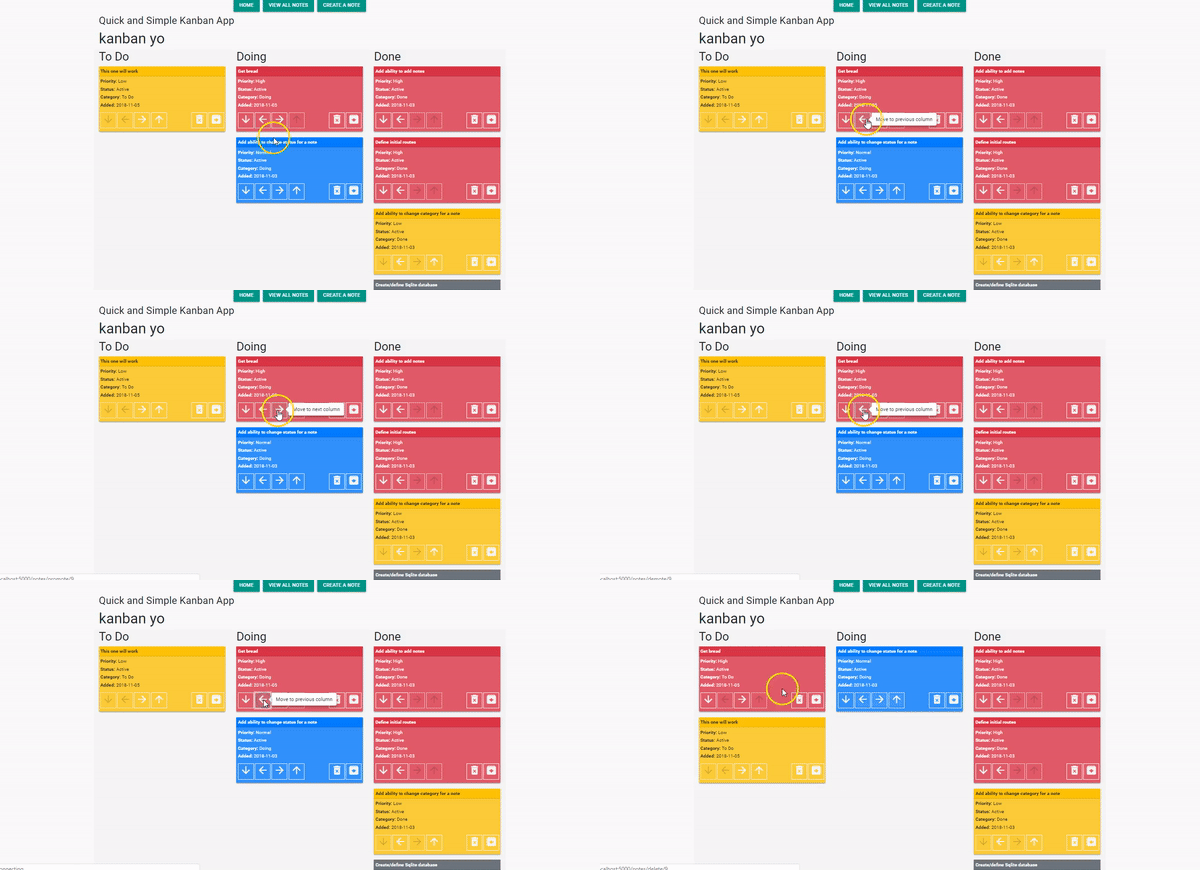
movealong

Park and revive tasks

Tasks can be parked, because that’s a realistic situation.
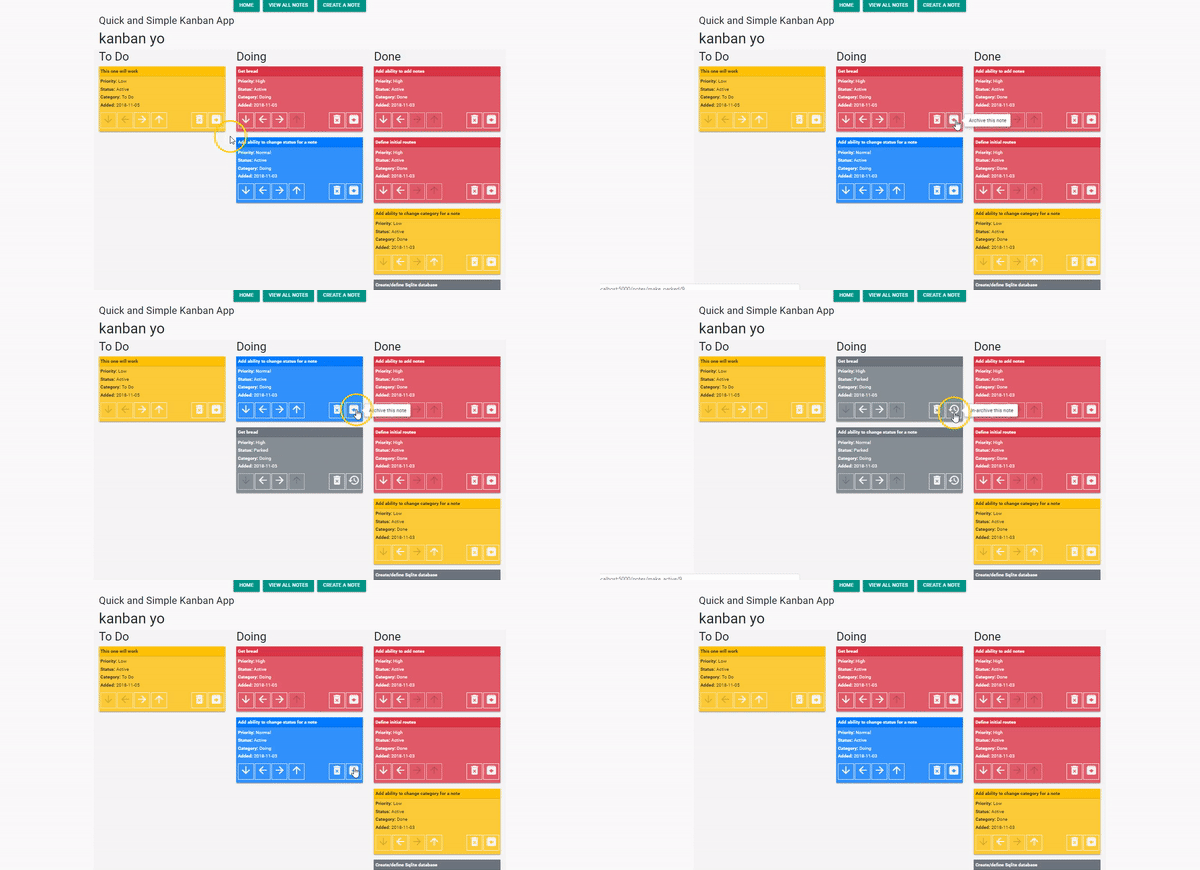
park

Next features to work on

  • Delete instantly deletes the task. Either prompt for delete and/or move them to a trash somewhere, where they can be viewed and restored.
  • Create another column on the left for a backlog, and maybe something on the right (or an archive) for completed tasks. As well as this, implement a work-in-progress limit, either per column or per board. Not sure how that would work with parked tasks.
  • Create users and log ins (I did this in one of the tutorials using sessions and a database). So I can have my tasks and someone else can have theirs. Teams?
  • Add a description to the task, maybe when you click a card the full details open in a modal. Then the priority/status/category/date values can be hidden from this overview, or replaced with icons to save space.

Summary

I’d be keen to use this with students. The amount of coding actually wasn’t that much, although there are some quite abstract concepts for them to get their little brains around. I like that they pretty much don’t need any specialist software on top of what they already have – we use PyCharm and they can pip install the modules they need. PyCharm has cool tools for working with Sqlite which I discovered is bundled in Python. This was a lot easier for me to pick up than Django, Rails, or Node and is easily powerful enough for what we need to do.

The new standards have requirements for using libraries etc so this is a big tick. Also, the concept of ‘features’ for the new iterative development standards becomes very accessible using this type of tool.

Flipped learning update

It’s been going well.

As mentioned in my earlier post I tried creating a bunch of videos and got generally positive feedback. They were mostly created in response to tricky concepts I saw coming up, or when I identified tricky concepts during teaching. This was rewarding but ultimately unsustainable. Working just-in-time isn’t going to help long-term, the resources I’m creating aren’t really re-usable, and my goal is to explore the flipped classroom to use with our new timetable structure in 2019.

I decided to use a more structured approach to see if this I can make this more sustainable. I’m doing this post now because I’m just about to pass a pretty big milestone in relation to my goal, and I want to log my progress so far.

Structured approach

My Y12 programming unit seemed like the perfect opportunity to try something new. It’s a well-established unit and assessment, I know the material inside-out, and if this doesn’t work out I’ve got solid resources and knowledge to fall back on. Currently, I split the learning into six area of content:

sections

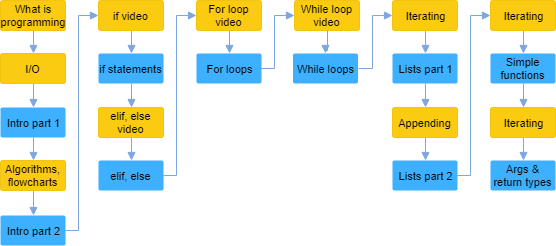
For each of these I have slideshows with detailed notes and explanations, and a range of exercises. I thought I’d set the goal to create an introductory video for each topic, but they would end up being super long. At a conference I went to recently (more below) they talked about the 1.5 minute per year level idea for maximum video length. That would mean 18 minutes as the maximum video length. Personally I’m not comfortable with that – there’s too much riding on each video. I’m trying a few video lengths, ranging from 6-10 minutes. I have some ideas for shorter videos later on, but that will be for very specific material.

So I decided to make multiple videos, focusing on one or two ideas each. This diagram shows my plan now:

sections-flipped

Progress

The students will watch the if videos tomorrow. Tomorrow is important because I won’t be there. If my videos are effective, they’ll get a lot done. If they aren’t… sorry reliever…

Also, I set the goal of gathering feedback from students about the videos at that point. So hopefully they are successful tomorrow. I’m aiming to survey for feedback on:

  • video effectiveness (do they learn, or do they find the teacher-led instruction better)
  • style/format (how I speak, screencasting code, notes)
  • technical (sound quality, prefer to watch videos in Google Classroom, Edpuzzle, Google Site, other)
  • anything else they think of

Alternative approach

So, this format seems like it will work, with positive outcomes. Teaching the intro lessons was much smoother than in the past, and much quicker. This seems to be because they were familiar with the concepts at the beginning of the teaching but the feedback will confirm or contradict this.

Another alternative format that might be of better use looking forward to the new timetable might be something like this:

section-complementary

Rather than having the videos as part of the linear progression of content (currently it is isn’t essential to watch the videos in order but it is probably detrimental not to) I could produce a series of content that is extra to the main progression. It would be supplementary/complementary and wouldn’t be necessary to complete. It would be useful for students wanting to practice or solidify concepts, for students to fill gaps when they miss class, for extension work.

My rules for videos, and some learnings

  • Creating them should be painless and versatile. Editing should be zero, or minimal. Screencast-o-matic is awesome so far.
  • Sound quality is important – students will be watching a lot. The laptop microphone is awful. I have a lapel mic, and a logitech headset with mic – both give very decent quality audio.
  • Hosting should be simple. Google classroom clutters quickly. Students don’t like our moodle. Edpuzzle is is useful but is yet another tool for students to remember. To avoid fragmentation and group all of my resources together I’ve created a google site (I swore I’d never again but the new sites is super simple and very slick). Videos are hosted on edpuzzle, slideshows are in google drive, both are quickly and easily embedded in the google site.
  • My videos are absolutely not exhaustive lectures of each topic, and don’t contain anything ‘critical’ that they won’t also get in class. They introduce some new concept(s) with simple examples. I try to put a challenging question or two in there as well. I ensure each video has closure – it doesn’t leave them confused about anything (more than you would expect, anyway).

Looped Conference

I attended a breakout session at the 2018 Looped conference on Flipped Classroom. The presenters told about their journeys so far, with some tips:

  • The one about length, mentioned above
  • Use edpuzzle.com (mentioned above). Edpuzzle is a flipped classroom tool for managing videos and tools. It gives some basic analytics (who’s watched, when did they watch, when did they last watch) and if you pay or jump through some hoops there are more advanced analytics.
  • Turn your webcam on, so your students can see you in the video. This one isn’t for me so far. I will try it soon and see what the students say. The idea is that your students connect with you, so seeing you is helpful. I see what they mean, but I’m happy to settle with just my voice for now.
  • Don’t make jokes. Yeah na that’s definitely not for me. I think my students would be totally confused if I went 5 minutes without a terrible joke.
  • Don’t let the students participate until they’ve watched. I don’t know where I stand on this just yet. Students will be watching in class (we have a no-homework policy, so I’m doing in-flip)

So I guess my next post will be about the feedback I get from students (from a formal survey, and anecdotal feedback I’ve begun receiving). It might also be about the plans for 2018. There’s been basically radio silence since the beginning of the year, which is alarming because it’s a massive change for both students and teachers. I’m exploring one promising idea, but apart from my Critical Friends group I’m operating in a silo so there really needs to be some information coming out soon.

Flipped Learning

This year my learning inquiry will be investigating and experimenting with Flipped Learning methods, or anything else I discover that catches my eye.

Why

I’m trying to address a problem and plan for a change:

  • The problem is that I spend a lot of time delivering content from the front. I want to offload that and have more time for individual work and better discussion
  • The change is in our school timetable. Currently a senior student at this school has 6 timetable lines of 5 periods each. So I see a student for 4 time(3 single lessons and a double). Next year one period on each timetable line will become ‘free time’ (I don’t know or haven’t heard exactly what it’s going to be called yet).
    Year <=2018 >=2019
     11 (6 subjects) 5 periods each = 30 in-class periods  4 periods each = 24 in-class periods, 5 ‘line 0’ periods
     12 (6 subjects) 5 periods each = 30 in-class periods  4 periods each = 24 in-class periods, 5 ‘line 0’ periods
     13 (5 subjects) 5 periods each = 25 in-class periods, 5 study periods  4 periods each = 20 in-class periods, 5 ‘line 0’ periods, 5 study periods

    Students will choose how to use this time. Teachers will have a line of extra timetable slots now, but how these are used is to be decided by departments. Bigger departments seem to be looking at having a teacher accessible at all times (timetable depending). For me as the only DT teacher (hopefully there’s 1.5 or 2 of us in the next year or so) this is problematic as I my availability and my students’ may not cross very often.

In my research last year I saw a lot of reference to Flipped Learning and it looks like it can help to address both of my issues above, so here we go.

Stage 1: what exactly is Flipped Learning and will it work for me?

I like wikipedia‘s definition best:

Flipped classroom is an instructional strategy and a type of blended learning that reverses the traditional learning environment by delivering instructional content, often online, outside of the classroom. It moves activities, including those that may have traditionally been considered homework, into the classroom. In a flipped classroom, students watch online lectures, collaborate in online discussions, or carry out research at home and engage in concepts in the classroom with the guidance of a mentor.

I just crossed the homework bit out because I don’t like/give/expect homework and also the school has a “no-homework except for some things related to assessments” policy.

I think this will be good next year because in their downtime, students can watch videos or do readings, and come to class ready to get going actually using the information or applying what they’ve seen. Some other benefits I see:

  • Students are out regularly, this will help them catch up on their own time.
  • Some students don’t do well being talked at. With a video they can re-watch, pause, or watch in bits.
  • I have a reasonable number of international students, I’ve used similar concepts in the past with good results.

I also did a couple of readings. On tki’s Flipped Learning page I found The Flipped Classroom and The Flipped Learning Model. The former was useful but maybe a bit biased as it was written by the guys who essentially ‘started’ Flipped Learning. The latter is interesting, it essentially said there hasn’t been much research done on the effectiveness of Flipped Learning but the research done has generally shown at least marginal gains. It also seemed quite biased.

Step 2: plan

Basically I just want to rip into it and see what happens. I’ve got a web project I’m halfway through which would have really benefited from having a bunch of resources students could work through alongside what I actually want to do in class. Here’s a 3 minute video on what a database is. Here’s a 2 minute video on primary keys and some obvious ways they keep our data accurate. We’re currently beginning to write queries and I don’t think it’s too late to put together a set (maybe 3-4) of screencast videos talking through the process of breaking down the question, looking at the data, and then bit-by-bit building the query.

How to measure it? I’m thinking of using student voice. I have some very honest students and I think they’re comfortable criticising me (and I’m a big boy, I can handle it). I get the feeling they’re ok with what we’ve done so far, but not loving it. I might poll them now, spend a week or 2 delivering lessons differently, then poll them again.

I’m going to continue reading, but try to find stuff not written by people with an interest in promoting Flipped Learning. Teachers and researchers would be nice. I’m also going to look at already made resources and see if they suit. Generally I don’t like using online learning tools such as codecademy, khanacademy, or codeavengers as they’re very linear and I can’t exactly control the content. However I might use them to complement what I already do. I just need to give away some control for the benefit of saving some time.


How full is your bucket?

So after an absolute minefield of a year last year, 2017 was meant to go smoothly. A family bereavement, a toddler starting daycare and then getting every malady under the sun, and work issues that I can’t describe on here saw to that dream. So a lot of the goals I’d set myself have been delayed and a lot of the new stuff I wanted to do for my students hasn’t happened. No-one has been disadvantaged and deadlines are being met, but I just have this overwhelming feeling of disappointment as every time I start to get a step ahead I hit another landmine and find myself 2 steps back.

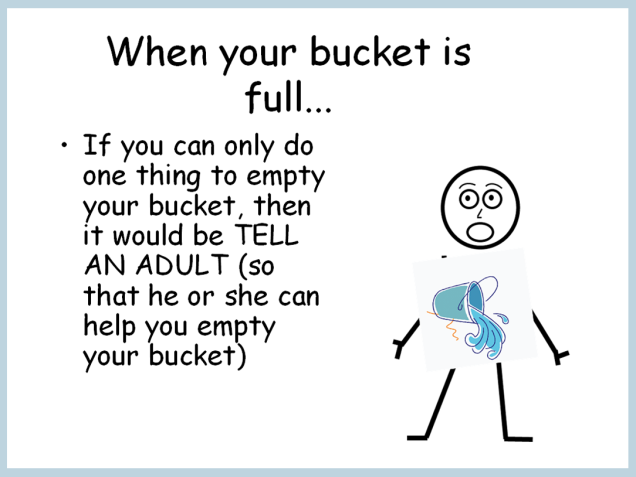
On a course recently a presenter referred to the idea of being overloaded as his “bucket being too full”. I’ve tried to find the source for this (he referred to some PPTA work) but what I found was kind of the opposite. There is a quite popular looking book which even has a ‘for kids’ version which presents the concept as someone who has more positive experiences have a more ‘full’ bucket – so the key to happiness is having regular (but not too often/many) positive experiences.

I eventually came across [comic sans warning] this presentation (CC BY-NC-SA) by Dr. Michael Cheng, Jennifer Boggett, and Marjorie Anderson.

bucket1

So basically I realised the obvious: that my stress levels are high because I’m over-committed. And the solution seems obvious: reduce current commitments and limit future commitments until balanced. The problem with the former is that some commitments are hard to drop. The problem with the latter is that there are some very exciting things happening at the moment. And a lot of my commitments are filling gaps that we’ve been finding throughout the year. Luckily the resource I found (again, apologies for breaking my no Comic Sans rule) has some advice:

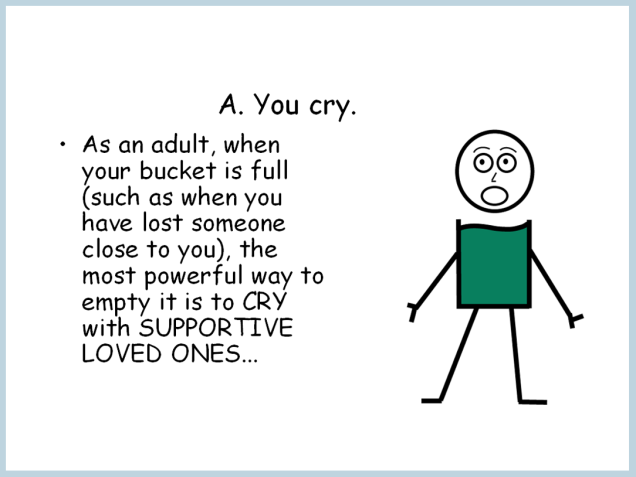
bucket2

Tell an adult. OK, I’m going to interpret that as ‘talk to someone’. Which I did, I talked to colleagues about work stress and my wife about home stress. Which was useful, as now they know to give me space to balance things out and to not put too much on me in the near future. I actually also talked to my students about my stress (in the context of our long-term, school-wide push on wellness). And I talked to my critical friend group (which has definitely been a Good Thing) who were amazing at turning my perspective in different directions, helping me with where to go next. More advice:

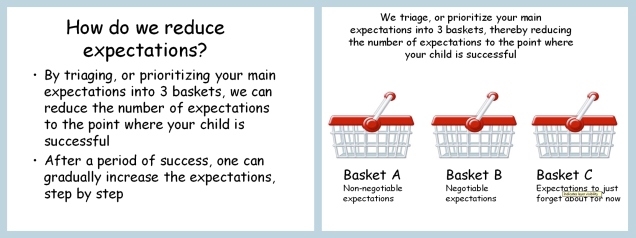
bucket3

No comment. Final piece of advice, and the most useful:

bucket4

This one is the hardest but its helpful to force me to look at what is really important right now and what can wait. Everything seems non-negotiable until you force yourself to be really honest, maybe that thing isn’t actually crucial, maybe letting someone down is OK you’re open if it means everyone is better off in the long run.

Conclusion

I have too much to do and not enough time to do it. That sounds like I’m saying the same thing twice but my previous coping mechanism for too much work was to stay up really late for a few nights or head into the office on the weekend to essentially create more time for school work – but with a toddler at home and another on the way those solutions no longer exist. The path through this is difficult but manageable:

  • Be open and honest with those around me. People are understanding and generally seem to have the same issues, to different degrees.
  • Prioritise/categorise what I can and can’t do. And be realistic about it.
  • Don’t take on any new things for a while. Essentially I’m not taking on anything new until November. Unfortunately I just accepted two quite large jobs that I can’t get rid of, both of which I really want to do, and one of which is paid, but neither of these things counter the fact that I don’t really have time or focus to do them properly.

All in all if I tick of certain jobs during these school holidays I’ll be on track. But I think I might take the baskets model mentioned above with me in the future, and be much more critical of accepting big tasks.

Footnote: licensing

This is probably the topic of another post, but… I apply Creative Commons licenses to everything I create in the classroom – assessments, teaching resources, other. I find some aspects of CC licences easy to understand and apply. Others not so much.

The resource linked and reproduced in this post is licensed as BY-NC-SA. To meet the requirements I have:

  • BY – stated the authors, linked to the original document and to the license (they didn’t state a version so I went for the latest international version).
  • NC – I’m not making money of this blog in any way
  • SA – do I have to license this blog post using the same license? I haven’t applied any license to this blog because I’m not really sure of it’s purpose – partly just my own thoughts, partly meeting PTC (pdf) requirements, partly putting together material for others.

So have I followed the requirements of the original license? I think so. Maybe I will write a post to document my adventures trying to figure out how to properly apply CC licenses to different materials.


Creating effective screencasts

A few years ago I had a class with some very particular needs. Firstly, I had some pretty keen athletes who tended to miss a lot of class. I also had quite a few international students who had trouble understanding me, so I generally ended up repeating myself or lot. Finally, I had some students who went to courses and work placements once a week or so.

A colleague suggested that recording my lessons might help all of these groups of students. An interesting idea – but my teaching style relies on a lot of conversation and a lot of what I call ‘momentum’ which I’m very confident wouldn’t transfer to video very well. Another showed me some screencasts, which I was impressed by so I went ahead and made a bunch. They were fairly linear -I think I broke up the process of developing a simple MS Access (yuck) database/app into about 6 stages and made a video of each of about 5-10 minutes. They were very well received by all the groups mentioned above.

Some positive feedback was:

  • Students could catch up on missed lessons, or go over what they’d not completed.
  • Students could pause and/or repeat sections of the screencasts.
  • The screencasts where in the school moodle system so were easy to access.
  • I purposefully spoke a little bit slower than I normally would, and over-pronounced a lot of words for clarity. This was to help international students deal with my accent but other students said it was useful

Some criticisms were:

  • Audio quality was variable. I eventually got my hands on a decent microphone.
  • Downsizing the resolution had led to some pixelation of small text which became hard to read.

Some of my issues included:

  • The videos were too specific – they showed one way to do something which restricted students to that method or solution
  • The technology dated – I only used Access once more after that but in that time there was a reasonably disruptive update which left at least some of the screencasts obsolete which is something I’d rather avoid.

Taking into account what was surprisingly positive feedback all those years ago, and the fact that most of the criticisms I think I can easily address, I’m going to make some screencasts.

Issues to consider at this point

  • Technology – which software to use, microphone, do I edit or try to get it right in one take.
  • Hosting – I want these to be private. For a range of reasons. Obvious options are google drive or moodle (as these are integrated within the school), or would YouTube or Vimeo be better?
  • Level – will I focus on low level material, or extensions work, or other.

Will this address my goal?

My professional goal is:

Investigate methods and modes for students to better engage with self-guided learning in programming.

One intention here is to do a bit of ‘flipped classroom’ type learning. These videos should be up beforehand so that at the very least they are available immediately after the relevant point in the teaching, but even better, beforehand so a student can watch and come prepared to work or ask questions.

Another is that if a student encounters an issue — either at home or in the classroom — they can pop over to wherever these are hosted and watch a tutorial on the relevant content.

Research

I did a bunch of reading, these were the most useful (in order of usefulness):

Which seemed to boil down to these points:

  • Be prepared. Write an outline or script. Practice it. If multiple apps are to be shown, open them and close everything else. If the desktop is to be shown, delete as many icons as possible.
  • Choose a good environment. Quiet. Undisturbed. Have a comfy chair and desk. Don’t be too warm or cold, and have water.
  • Technical planning. Spend a bit of time choosing software and getting to know it’s features. A decent mic can make all the difference. Consider the size of the mouse cursor and the output resolution (1920×1080 is far too big, everything will be tiny on a mobile device).
  • Edit efficiently. Cut out all the “um” noises and unnecessary pauses. Cut or speed up long bits of typing or other time-consuming processes. Transitions can be useful, or obnoxious.

Next steps

I’ve got an idea of what I want to cover in the first batch of screencasts, so I’m going to get in here and make, then assess where to go wit hit from there.

Annual Goal 2017

This is just a quick intro to the year. My goal is based around an issue I see which has been growing year-on-year. The problem is that as the material my students cover becomes more advanced, the students become more reliant on me as the source of… everything. I guess what it boils down to is I need to foster more independence in my students.

The first roadblock I can see is that there aren’t enough good quality resources that are at their level. There are books out there (and we have a few floating around the class) but they tend to accelerate a bit quick – they’re often aimed at tertiary students or adults. And they’re often quite dry. There’s also a bunch of online courses students can follow but these seem to be too rigid – if you’re stuck then you’re really stuck until someone tells you what to do.

Another issue is that they don’t have a solid foundation in this subject. They’ve been immersed in Maths and Reading and Science in different forms for years so feel comfortable exploring for themselves. Almost 100% of the time I have given my students their first taste of code, and probably 80-90% of the time they don’t know anyone else who can help them in any way.

So my idea is to look into ways for students to develop their learning independently. To try to fill in gaps in their knowledge before coming to me. I’ve got a few starting points based on prior experiences, and some resources shared with me via a professional group. Some of this will be easy stuff – develop my current course material. But I would also like to look for ways for students to be able to run their code and get instant feedback – where ever they may be.

So here’s the current wording for my professional goal for 2017:

Investigate methods and modes for students to better engage with self-guided learning in programming.

Annual goal

Last year the PLG system at my school changed – now we all have to publish our single annual goal in a shared spreadsheet which some magician then takes and makes groups from. My goal was an almost straight quote of two of the Practicing Teacher Criteria (PTC) (3 & 10).

How do I work effectively within the bicultural context of Aotearoa  while demonstrating my commitment to bicultural partnership in Aotearoa?

I kept the wordings of the Criteria intact to be honest to the fact that I feel like I’m starting from scratch here. I knew that once I got into it I would realise that in some areas I’m OK and some areas I’ve got a load road to travel but just looking at those two phrases – I’m intimidated and inspired.

From this I was placed into a group of about 8 teachers named “Bi/multi cultural approaches.” We immediately discovered that we were all at very different points on the continuum – a couple of us at the very beginning and some pushing the boundaries at the other end.  This is exciting for me as I immediately have a knowledge bank to tap into.

Our school has a three year cycle for covering the PTC – over the three years we are responsible for capturing evidence of our development in each of the twelve areas. I prefer this to doing all in one year as I strongly believe we would end up box-ticking, covering the Crieria with a mile-wide, inch-deep appraoch. The downside to this approach is that you tend to pick out the ‘easier’ criteria first, moving on to a bit of a challenge in the second year. And then comes the third year when you’re faced with that one you’ve been avoiding. For me this was PTC 3 & 10, and I know others have let it lapse this year so they won’t be covering the Criteria within three years for the reason mentioned above – avoidance. I’m attempting to confront in myself what I see as a form of ‘Pakeha Paralysis’ (the topic of a future post maybe).

Te Kotahitanga

I started by looking through a list of readings and picked out a couple, firstly The Te Kotahitanga Effective Teaching Profile (ETP) [full reading pdf]. The first part of it introduces the concept of deficit thinking which I read as kind of like making prejudice decisions about a person or group; the idea that when you already look at somebody/some people as having a deficiency when they enter the room your actions will follow that thinking and the relationships you develop and interactions you have will tend be negative. I reflected on this and think that this something that I do at least an ok job of – if not a good one – I am confident that I look at all students as opportunities for success in my classroom. One way I experience this is when I have a new student or class. I immediately try to find out about their background, their families, where they’re from and where they’ve been. When I find I’ve had a similar experience it is an opportunity to develop the student-teacher relationship. So i feel like I have a solid base in this area that I can build on with the concepts from the rest of the reading.

The second part of the ETP lays out six actions teachers can use to develop effective interactions. I am not qualified or confident enough to explain these, feel free to go through the reading (it’s only really 5 pages long) yourself but I will outline a few thoughts and notes.

Manaakitanga: Caring for students as Māori

  • Demonstrating on a daily basis a care for Māori students as Māori
  • Recognise Māori students as being culturally located; that is, as having cultural understandings and experiences that are different from other people in the classroom. I’ve had conversations with people (non-teachers) recently who can’t accept the notion of difference so I can see that this may be an issue with some teachers.
  • Māori people see, understand and interact with the world in different ways, and it is important that teachers are able to create learning relations and interactions where this is fundamental.

Mana motuhake: Caring for the performance of Māori students

  • Have high expectations – “teachers get what they expect from Māori students”

Ngā whakapiringatanga: Creating a secure, well-managed learning environment

  • “Effective teachers and the[ir] students spoke of the strong desire for and necessity of the boundaries, rules and organisation that are fundamental to effective learning. This includes teachers knowing their curriculum area and being able to use the curriculum flexibly so as to respond to the learning conversations being developed in the classroom.” Which leads to two implications:
    • teachers are able to create a secure, well-managed learning environment by incorporating routine pedagogical knowledge with pedagogical imagination
    • teachers need to be able to organise classrooms so that all the individuals involved are able to contribute to their own learning and to support the learning of others

In this area I would rate myself in a number of ways: firstly a strength in understanding my curriculum and subject area well and being flexible ad innovative. I give students opportunity learn and demonstrate learning in a range of ways and am responsive to students’ needs. Students are certainly given opportunity to contribute to their own learning and that of others.

A weakness for me may be the structure of the classroom. I do not operate a strict setup, instead operating on high-trust for students which I believe has been successful so far and has in it an implicit agreement by the students to recognise and respect boundaries. This is mostly successful but for select students this is not the optimal environment which is something I’ve been reflecting on recently.

Wānanga: Engaging in effective learning interactions with Māori students

  • I think I fare quite well in this area as I can not teach using traditional methods. I’ve encountered situations where students benefit from writing notes or being lectured but for me this is an exception. I tend to prefer discussion – which often veers off track and eventually finds it’s way back – and cannot resist bring in personal experience, teacher’s or student’s. the next step for me is to look to use this to engage in effective teaching interactions with Māori students as Māori.
  • I can certainly improve on the quality of my feedback and have this year introduced a few mechanisms for ensuring quality formal formative feedback on work.

Ako: Using a range of teaching strategies

  • “to learn as well as to teach”
  • a teaching–learning practice that involves teachers and students learning in interactive, dialogic relationships”
  • “teachers use strategies that promote effective teaching interactions and relationships with their learners; teachers can learn from students just as students learn from teachers”

Kotahitanga: Using student progress to inform future teaching practices

  • Working together, involving Māori in reflection on goals and outcomes. Reflecting collaboratively.

Next steps

  1. In a recent staff meeting we reflected on Māori student success and discussed three concepts – Te Kotahitanga, Tātaiako , and Ka Hikitia. I’m going to review these and see if they are useful for my goal.
  2. I’ve selected another reading (Providing a culturally responsive environment for gifted Māori learners (2009) by Jill Bevan-Brown of Massey University.
  3. Talk to a few students about the six actions identified in the ETP. I would like to hear some student voice on if they recognise the concepts, if they can give useful examples of how they are currently being met (by me or others), and if they can give me some direction on working towards my goal.

Programming concepts

A few thoughts on roadblocks my students have come up against while learning Python this year.

Premature optimisation

Maybe not strictly premature optimisation but basically using multiple functions inline can cause confusion, and it is very tempting to teach some concepts this way by default. I found a nice explanation/description of premature optimisation (just the first section) that deals with the concept from the point of view of an experienced programmer, but I think it works for beginners as well.

Here’s a basic example, taking an input from he user and casting it as an integer:


# inline int casting
user_age = int(input("Your age: "))
# separating the input from the cast
age_as_string = input("Your age: ")
user_age = int(age_as_string)
# this is more confusing, using the same variable name
user_age = input("Your age: ")
user_age = int(user_age)

view raw

prem_opt.py

hosted with ❤ by GitHub

I’ve mostly taught the first way – “wrap the input function with int()” – and found some issues with student understanding. So I’ve started teaching the second way and students have definitely had better understanding and less errors, I think because 1) they take more notice of the cast and what is actually happening, and 2) there is less python syntax per line to try and get their heads around.

print() and format() [python]

I’ve started going almost directly to printing with .format() and have had far less issues with output.


name = "Rosa"
age = 14
# example 1 – passing values to print() and letting it do the work
print(name, "is", age, "years old.")
# example 2 – print() puts a space between the parameters passed to it
print(name, "is aged", age, ".")
# example 3 – concatenate the strings, but you need to introduce spaces and cast ints etc as strings
print(name + " is aged " + str(age) + ".")
# example 4 – use .format()
print("{} is aged {}.".format(name, age))

Example 1 – we can send all the parts of a sentence through to the print function and let it concatenate. Works a lot of the time, except when I want to place arguments directly next to each other.

Example 2 – I want to add a full stop directly after a word, unfortunately print() adds a space between the values it is passed as arguments so we get a space between the word and the full stop.

Example 3 – concatenate myself then send the joined string through to the print function. This gets messy we need to consider spaces and numeric values need to be cast as strings which introduces even more complexity.

Example 4 – use .format() to construct my sentence. More groundwork is required early on but students generally pick this up quickly and I introduce positional arguments later when the output strings get more complex and they want to use a value more than once in a string.

What actually goes in a try/except

My first problem is that I continually talk about try/catch while python uses try/except keywords, but I’m getting used to it now. This example is out of context but is useful to illustrate the issue – what goes in a try statement and what goes after.


# do calculations inside he try/catch
while True:
try:
length=int(input("\nPlease enter the vertical length of the square (in centimetres): "))
if length<=0 or length>150:
print("Please enter a number between 1-150.")
continue
p_square=length*4
a_square=length*length
print("\nThe perimeter of your square is {} centimetres.".format(p_square))
print("\nThe area of your square is {}.".format (a_square))
break
except ValueError:
print("Please enter integers only.")
# use the try/catch *only* to take the input, do calculations once you have a valid value
while True:
try:
length=int(input("\nPlease enter the vertical length of the square (in centimetres): "))
if length<=0 or length>150:
print("Please enter a number between 1-150.")
continue
break
except ValueError:
print("Please enter integers only.")
p_square=length*4
a_square=length*length
print("\nThe perimeter of your square is {} centimetres.".format(p_square))
print("\nThe area of your square is {}.".format (a_square))

view raw

try_catch.py

hosted with ❤ by GitHub

I try to push the idea of only putting in the try block enough to achieve the purpose of using it. In the above example a try block is used to cast a string as an int (and catch any ValueError exceptions) so we move all the code after the cast to after the except clause. But then it is useful to place a boundary check inside that loop, which violates what we’ve just talked about. And although my students tend to pick up break and continue pretty quickly, seeing them on consecutive (indented) lines usually causes some hands to rise.

We eventually write a function to get int or float values from the user which kind of nullifies this is issue anyway, but for me correct uses of try/except can indicate accuracy/efficiency when it comes to NCEA marking.

Anyway these are a few things that have been on my mind as I try to teach python to the third (27 girls) and fourth (29 girls) classes this year.

Testing my coffee store assessment idea

Agenda for my code day

I finally found time to sit down and try out all the ideas floating around in my head for my Y13 web projects (and possibly other years as well). The goals for my day, in order:

  1. Create a simple responsive site using media queries – scale well on my phone, ipad mini, 1920×1080 laptop.
  2. Figure out how the hell bootstrap works and decide if its viable to use with students at short notice (i.e. this Tuesday)
  3. Put together a database for a school cafe (that only sells coffee, because what else do I need?) and build functionality to view and place orders.
  4. Implement some security (as required by the relevant Achievement Standard)
  5. Try out the google chart api to visualise some data from the database (requires php for a query then javascript for the chart)

Media queries

This went pretty well – the queries were straightforward to write and I experimented with additive/subtractive queries. I think the best thing to do there is build for the media you think your site will be used on, then use media queries to add responsiveness. After an interesting conversation with a couple of students about the printable aspect of the NZ Govt Web Usability Standard I tried a print style as well.

I put my files into xampp/htdocs to open them on my phone, looked good and was happy although a little underwhelmed. Too easy.

Bootstrap

This is something I’ve been wanting to try for a few months. I’ve never used a css library so didn’t know how to go about this (except linking the file).  The tutorials on tutorial republic.com are in my opinion fantastic and guided me through the process. The home page I created is almost identical to their sample page, but the rest of the pages I made myself. A summary of things I implemented:

  • Created a page-width navbar at the top of the page
  • Created a jumbotron area
  • Used coloured buttons (btn-success, btn-danger) to make things stand out
  • Used the grid system with rows and columns differently on each page to see how they worked
  • Used panels to group information together
  • Found img classes and used img-circle
  • Designed a form using text, password, dropdown, radio types. (Used a php script and an sql query to populate the drop-down menu with coffee flavours)

The other good resource I found was getbootstrap.com which is a complete bootstrap reference and accompanies the tutorial nicely.

Overall pretty straightforward although I’m not 100% on the difference between

<div class="col-md-4">

and

<div class="col-lg-4">

as they all seem to scale on smaller devices, why not just use lg and be done with it? Oh well, it will come to me.

Coffee store database

Nothing challenging here, a couple of pros and cons:

  • I didn’t normalise the tables properly to begin with so had a bit of refactoring to do. A bit worrying since I’m teaching it this week but good revision for me
  • Used a few enums, which feels like setting a foreign key restriction except without creating an extra table
  • Named a table ‘order’, which was a bad move since ORDER is a reserved keyword
    • While solving this, I read an interesting discussion on using singular vs. using plural for table names. I’m going to stick with singular.
    • I then got sidetracked on a discussion on choosing the size of fields in tables, which didn’t reach a consensus but definitely stimulated my tired brain
  • Wrote a script that generates a .sql file which clears the tables out and then inserts a bunch of test data. Efficiency!
  • The site lists coffee orders from today, I might add a boolean ‘complete’ so I can keep old orders in there (for statistics, see google charts below) and only show ‘live’ orders.
  • For adding new orders I put together some php that takes a username/password, checks it (uses md5 on the password) then inserts the order, or returns you to the form with your values back in the fields (except password). Wrote a registration script that validates your email then enters you in database (with MD5’d password).

Security

I used this tutorial to do all of the security stuff mentioned above, and actually got sessions to work although I don’t think I’ll require that my the project – it’s complex enough already.

On the page where I’m listing live orders I’m going to add a small form that enables an ‘admin’ user to ‘complete’ an order which should be trivial after adding the ‘complete’ field to the orders table.

I also found out that POST isn’t actually secure (without SSL, I think) – just more secure than GET. I think for the purpose of this project using POST will be enough for me.

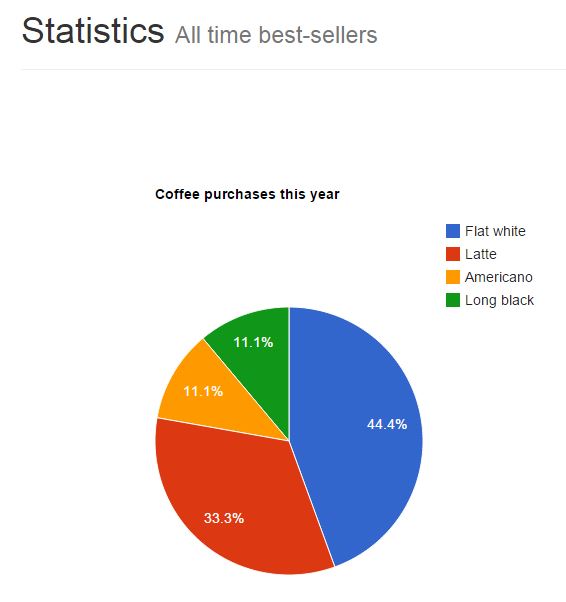
Google charts

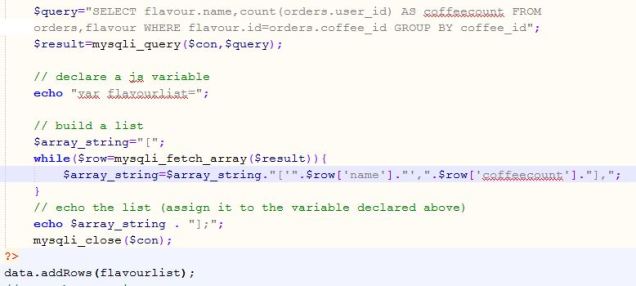
This didn’t take too long, I just have a problem with

php generating a javascript array

and the output looks like this:

outputted javascript

Which has an annoying comma after the last element in the array but I can’t be bothered modifying the script since it works.

I haven’t looked into modifying the appearance of the graph yet, so it currently looks like this:Google chart

Next steps:

  1. Put in another graph, customise both (I’m thinking colours, legend to begin with)
  2. Modify the orders table with a ‘complete’ field, modify php to take advantage of this
  3. Get back to bootstrap and styling, which was the main point of doing this.

My wife isn’t impressed that I spent a quite nice day on my computer, but feeling much more prepared and got to clear a bit of junk out of my head. Now I’m really looking forward to working on this with my students this term.

HTML/CSS learnings

Responsive design: additive or subtractive?

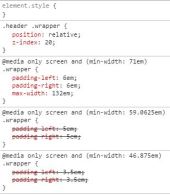
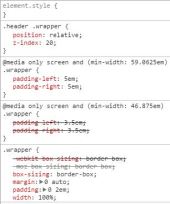
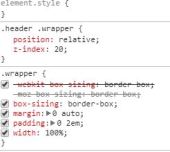
Using wellingtonnz.com as an example of media qureries for responsive design, I noticed a pattern that differs to what we’ve been learning here – the ‘base’ style is overridden as the screen becomes wider. Here’s some snips of what I mean:

Screen snip of media query code from wellingtonnz.com
1920px width: Code for smaller screen sizes is “overridden” at large resolutions
Screen snip of media query code from wellingtonnz.com
~1100px width: The next “level” is now enabled and chrome developer tools has hidden the now redundant code (with the now false query)
Screen snip of media query code from wellingtonnz.com
<700px width: only the 'base' style is active


In my head I've been calling this additive (so the opposite, using max-width would be subtractive) media queries as I can't find a term for it anywhere. I'm thinking that increasing/decreasing might be better terms though as nothing is really 'added' or 'subtracted' to the code or page, although this guy on stackoverflow  and this guy on github are on my wavelength. I’ve done some quick reading online and it seems (logically) that the strategy to use depends on whether you’re designing for mobile for first or higher-res first. A look at the wellingtonnz code makes me think they (or their cms) have thought of mobile first.

In class I’m going to do the opposite to this. Students are used to coding for 1920px wide so their ‘base’ styles will be coded this way. Then we will use max-width to add styles for very small (mobile) devices, then some intermediary styles.

New HTML5 structural elements

Section, article, nav, header, footer, aside.

We’ve been using header, nav, and footer this year with no trouble (they’re fairly logical to understand) and some students have used asides well.  We’ve encapsulated all other page content into one container section or article which has essentially just replaced the classic

so my other challenge in the next web unit is to use section and article correctly. I’ll be looking for opportunities to group content into articles (and sections), ensure they are structured correctly (including headings which should be easy given our focus on accessibility). And then add classes to them for styling.

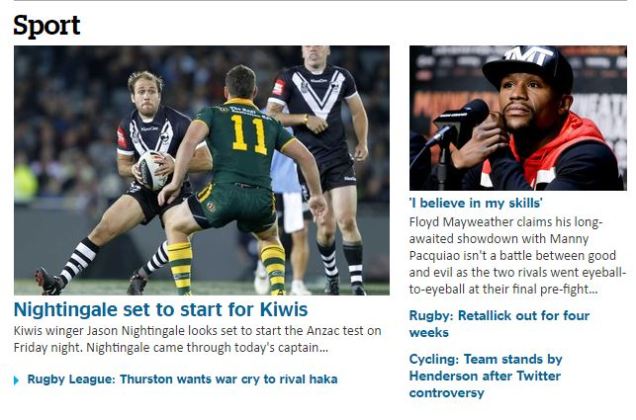
I’ve struggled to really ‘get’ the difference between section and article until I read the analogy of a news site, which is actually a logical analogy to begin with when trying to understand sections and articles. On the new site I frequent – the NZ Herald – the home page has sections such as ‘National’, ‘Business’, and ‘World.’ These are groupings or collections of other content – articles. The articles themselves are groupings of content – headings, images, sometimes descriptions.

For a visual explanation scan this snip from the Herald:

Screen snip fro mth NZ Herald

An outline of the code for this might look like:

Sport

Nightingale...Kiwis

Kiwis...captain...

I...skills

Floyd...

Rugby...

Cycling...

That’s how I see it in my mind anyway – I just needed to get that down somewhere. When I get some more time I’ll scan the Herald code and do some more research in this area.